Self-Hosted agent on Azure Pipelines

Summarization from Microsoft

If your pipelines are in Azure Pipelines, then you've got a convenient option to run your jobs using a Microsoft-hosted agent. With Microsoft-hosted agents, maintenance and upgrades are taken care of for you. Each time you run a pipeline, you get a fresh virtual machine for each job in the pipeline. The virtual machine is discarded after one job. Microsoft-hosted agents can run jobs directly on the VM or in a container.

Azure Pipelines provides a pre-defined agent pool named Azure Pipelines with Microsoft-hosted agents.

For many teams this is the simplest way to run your jobs. You can try it first and see if it works for your build or deployment. If not, you can use a self-hosted agent.

Self-hosted agent

An agent that you set up and manage on your own to run jobs is a self-hosted agent. You can use self-hosted agents in Azure Pipelines or Team Foundation Server (TFS). Self-hosted agents give you more control to install dependent software needed for your builds and deployments. Also, machine-level caches and configuration persist from run to run, which can boost speed.

Why the article


When i tried to implement a scenario for training purpose, I got following message from execution of Microsoft Azure Build Pipeline.


No hosted parallelism has been purchased or granted. To request a free parallelism grant, please reach out to azpipelines-freetier@microsoft.com with your name and organization name


Fortunately, there is a well-design submission form at https://forms.office.com/pages/responsepage.aspx?id=v4j5cvGGr0GRqy180BHbR63mUWPlq7NEsFZhkyH8jChUMlM3QzdDMFZOMkVBWU5BWFM3SDI2QlRBSC4u 
in order to request increased parallelisim in Azure DevOps.

But according to Microsoft announcement, it could take 2-3 business days to complete which was quite late for me so I looked around for an instant solution and came up to self-hosted agent and implemented it to my DevOps organization which saved me not to postpone demonstration.

It works so no need to wait couple days :)


I was ready for the lecture by implementing self-hosted agent approach.

Step by Step configuration is below.

1-  Personal Access Token

Authenticate with a personal access token (PAT)

  1. Sign in with the user account you plan to use in your Azure DevOps organization (https://dev.azure.com/{your_organization}).
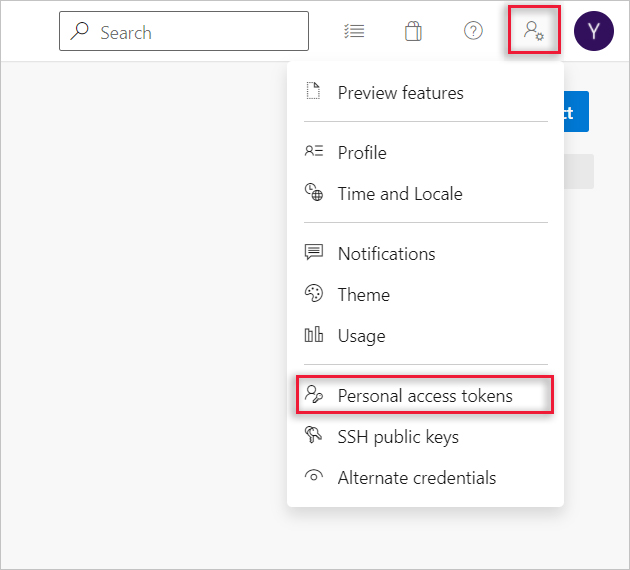
  1. From your home page, open your user settings, and then select Personal access tokens.

    Go to your security details.

  2. Create a personal access token.

    Create a personal access token.

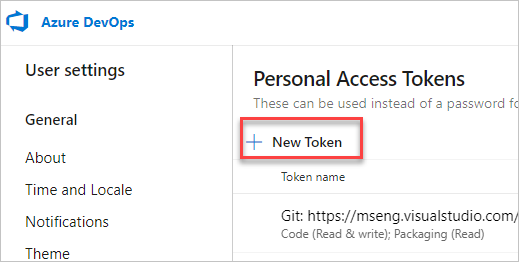
  1. For the scope select Agent Pools (read, manage) and make sure all the other boxes are cleared. If it's a deployment group agent, for the scope select Deployment group (read, manage) and make sure all the other boxes are cleared.

    Select Show all scopes at the bottom of the Create a new personal access token window window to see the complete list of scopes.


  2. Copy the token. You'll use this token when you configure the agent.

2-  Download client tools

https://docs.microsoft.com/en-us/azure/devops/pipelines/agents/agents?view=azure-devops&tabs=browser

Hopes, above URL has not been deprecated when you read the article. For such case, you can download it from my Google Drive (Windows Agent (x64, x86) ->
https://drive.google.com/file/d/1aeOc6or0pALQuq_YjTGEYk2eXOOxhDQl/view?usp=sharing since i am going to describe in my Windows based system.

you can ether download a build for 
- macOS agent
- Linux agent
- Docker agent


Check prerequisites for Windows based environment;

Make sure your machine has these prerequisites:

Windows 7, 8.1, or 10 (if using a client OS)
Windows 2008 R2 SP1 or higher (if using a server OS)
PowerShell 3.0 or higher
.NET Framework 4.6.2 or higher


3-  Configure & Run


Here is my implementation with screenshots;


  • open Windows PowerShell
  • type mkdir agent; cd agent
  • type folowing commend to unzip agent zip and make it ready.
    Note: supposing agent zip file is now under Downloads folder of Windows.
Add-Type -AssmblyName System.IO.Compression.File System; [Systm.IO.Compression.ZipFile]::ExtractToDirectory("$Home\Downloads\vsts-agent-win-x64-2.194.0.zip","$PWD")


  • then type .\config.cmd to start initial configuration. PwerShell scriptlet will ask URL of the agent. type https://dev.azure.com/{Organization Name}

    During execution, i faced error once due to internet conenctivity issue at my end. However, I finally was succeeded to complete initial configuration.


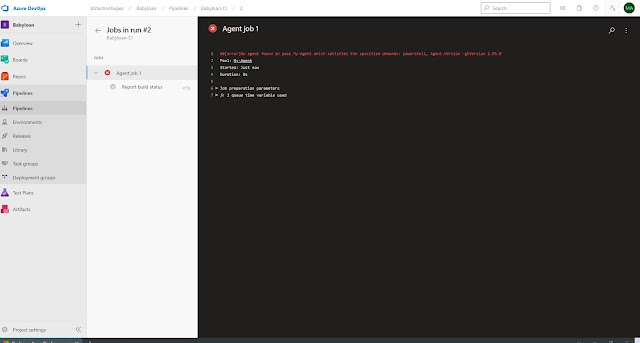
Check self-hosted configuration at DevOps side

open project settings from DevOps;
https://dev.azure.com/{organiztaion name}/{project name}/_settings/agentqueues


then click Default (self-hosted portal), find local source under agent tab. It is created by agent configuration.


  • type .\run.cmd to start agent


Agent is now ready :)


when you trigger a pipeline, you will see how it works great :)


Good luck...

Comments

Popular posts from this blog

Complex Query in QueryExpression in Microsoft CRM 2011

Exception caught instantiating TERADATA report server extension SQL Reporting Services

Microsoft Power Apps Portal integration with Dynamics 365 CE On-Premise - Step By Step Guide